In order for your object to have properties inside the GLCV3 editor, you need to create a property sheet.
To make things even easier, we created a small app that allows you to construct your property menu. It is labelled propconstruct.exe and is downloadable via the SDK portal.
The propconstruct.exe application allows you to create and edit property menus. It’s very easy to use. You simply create your property tree structure with a preview. When done, you need to save this menu to GData\props\identifier_name.prp
You must use the exact identifier you used for your object, it is case sensitive too.
Creating a Property Sheet
You can simply right-click anywhere in the left hand pane to open up the popup menu. To add a new property name, simply select ‘Add Property‘
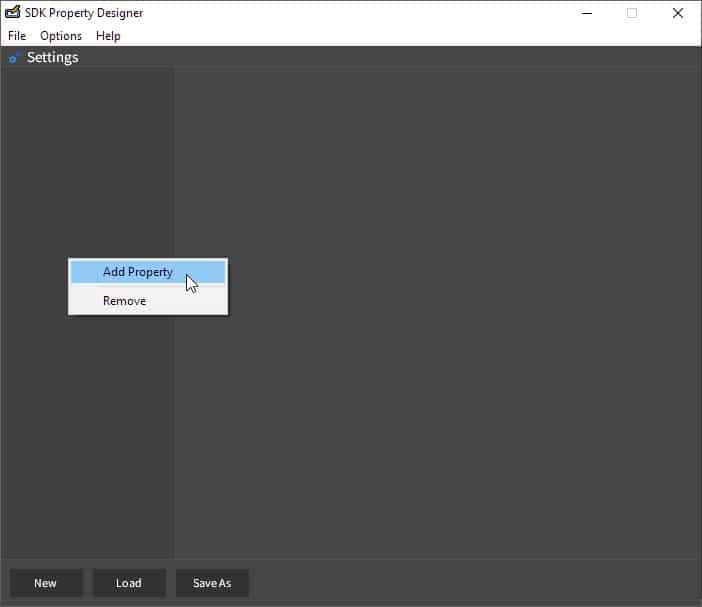
An input dialog should appear allowing you to type in the Property name. We recommend you keep these short and sweet as to fit in the dialog box.
You should not use | or # inside your property name. These are reserved for GLCV3.
Editing a Property
To Edit a property name, you can simply long left-click on the text label, or you can right-click the property name and select edit.
Removing a Property

To remove a property, simply right-click on it and select Remove.
Construction of Property Settings File (PRP2)
The construction of the property text file is fairly simple and straight-forward. We will cover that here.
Property File
The format is just plain text and the structure is an INI structure. Your property sheet file should go into GLCV3 Folder\Gdata\props\ and must be named the same as your idenfitier, so if your identifier is example, then the full path should be GLCV3 Folder\Gdata\props\example.prp2
So together with the prp menu file example.prp you should now create a text file called example.prp2 in the same directory. Then open up example.prp2 in your favourite text editor.
Object Welcome
The first lines of your PRP2 file should be
[welcome]
intro=Your intro here.
This is the first thing the user sees when they open up the settings for your object. It is useful for you to put some information in here regarding the object. You can use hyperlinks (URLs) and they will be automatically converted into clickable URLs inside GLCV3 editor.
So if your setting was
[welcome]
intro=To use this object, documentation is available at https://byteboxmedia.co.uk – Please do not use this object without the proper license.
This is how it will look inside GLCV3…
Y Buffer
The y_buffer setting tells V3 the pixel buffer between each control draw. You can change this to widen the gap between controls, although we recommend keeping it around 20. You should specify it in the Welcome group like this
[welcome]
y_buffer=20
Property Groups
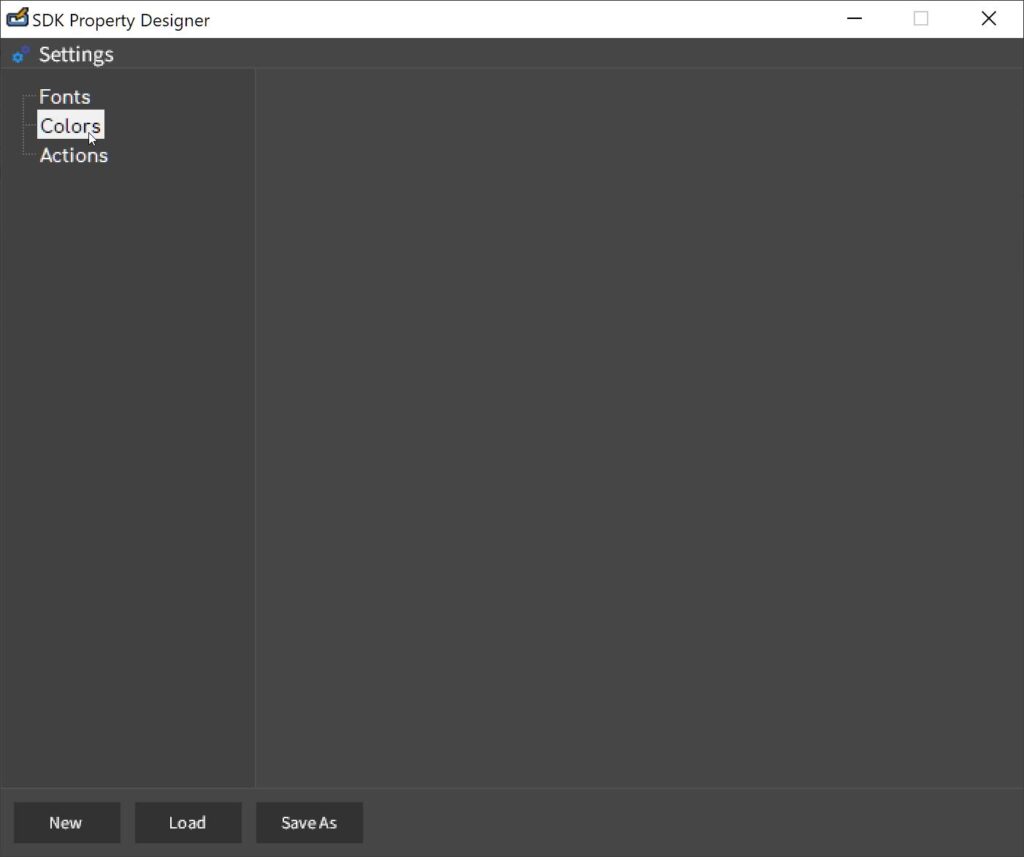
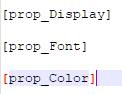
You should have a property group for every property available in the object’s properties. For example, in your tree, if you have 3 properties Display, Font and Color, then you should create a property group for each one, beginning with prop_<Name>. So in this example, there should be 3 groups created called prop_Display, prop_Font and prop_Color…
Property Group Settings
To build the settings page for each property underneath the group for that property you should specify a 0-based index list in order you want V3 to draw the property page.
These are parsed from top to bottom, in order. So for our Font property in the above example, let’s break it down.
Property Group Item Count
This is the first property of every group. You are telling V3 how many line controls to draw. So if we have 3 like the example below, we need to stipulate count=3 here (Everything in these property files is CaSE SensiTivE.)
[prop_Font]
count=3
Then we construct the rendering of the page as we want to like this example…
0=Heading|Set Font
This tells V3 to draw a heading and then set the text of that heading to Set Font
V3 will then indent a line down and draw the next control.
1=Text|Please select a font to use for this object
This tells V3 to draw a text string and caption it with Please select a font to use for this object
2=Font Button
This tells V3 to draw a Font Button so when the user clicks the font button, a font dialog will appear where they can stipulate what font to use, font size and any effects.
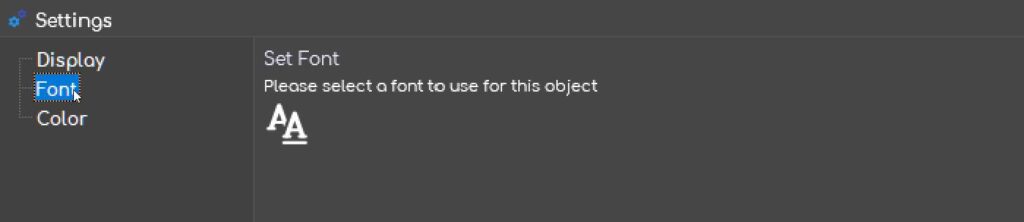
Ultimately, this is what it will now look like when the user clicks on the FONT setting…
The Controls and their Settings
To stipulate a control, like above, use the following delimited method: =control_name|param1|param2|param3|param4 etc. in a list order.
Heading
Control Name: Heading
Param 1: Y Buffer
Param 2: Text for heading
Example: 0=Heading|Font Settings
Text String
Control Name: Text
Param 1: Y Buffer
Param 2: Caption for text string
Example: 0=Text|Use this section to configure your settings
Font Button
This control fires up the font change dialog. From here the user can select a font, font size, font color (not in use), bold and italic. They are returned and set as the following parameters.
Control Name: Font Button
Param 1: Y Buffer
Param2: font_name
Param3: font_size
Param4: font_color
Param5: font_bold
Param6: font_italic
Param7: Edition Restrictions
Example: 0=Font Button|fname|fsize|fcolor|fbold|fitalic|indie,dev
Color Dialog
This control fires up the color selection chart dialog. The user can choose a color from the graph or stipulate their own via the plethora of conversion options available. The value returned is the system index.
Control Name: Color Dialog
Param 1: Y Buffer
Param 2: color
Param 3: Edition Restrictions
Example: 0=Color Dialog|bg_color
Toggle
This is the toggle control that allows the user to ‘toggle’ a setting. The return is a boolean, 0=off and 1=on.
Control Name: Toggle
Param 1: Y Buffer
Param 2: Toggable Resource
Param 3: Toggle Caption
Param 4: Edition Restrictions
Example: 0=Toggle|loop_video|Loop Video
Separator
Tells V3 to draw a separator line
Control Name: Separator
Example: 0=Separator
TextBox
This is a textbox the user can type something into
Control Name: Textbox
Param 1: YBuffer
Param 2: Resource Name
Param 3: Require Editor Refresh (0/1)
Param 4: Default Text to Display
Param 5: Tooltip
Param 6: Edition Restrictions
Example: 0=Textbox|20|user_name|1|Enter username|My Tooltip here
Dropdown
Creates a dropdown list with a series of options. You can choose to store the actual text as a resource or the line number (starting index 0). You could choose to store the line number but use the list to display textual references.
Control Name: Dropdown
Param 1: Y Buffer
Param 2: Text options separated with ] (ie: option 1]option 2]option 3])
Param 3: Data Type (0 = number, 1 = text) – the type of data to store in the resource
Param 4: Resource Name
Param 5: Default Selected (default selected if no value found. use the line index number (ie: 2)
Param 6: Tooltip
Param 7: Edition Restrictions
Action List Editor
You should only use this object on its own page. There are no customization options available. Simply specify the Parent Group as ‘Actions’ then inside do
[prop_actions]
count=1
0=Actions
1=Edition Restrictions
and V3 will automatically setup and assign an action list for this. If you are wondering how the custom events system works, you will need to liaise with the V3 development team regarding this as events will need to be manually setup by us.
Library Browse
This will create a ‘Browse Library’ button. You can use as many of these as you like. Each one is assigned a ‘resource value’ where the file the user selected is stored. This is just a relative path to the project’s gdata or data folder (ie: mybutton.png)
Control Name: Library
Param 1: Y Buffer
Param 2: Resource Name
Param 3: Edition Restrictions
Example: Library|20|selected_filename
Text Editor (Content Editor)
This will create a multi-line edit box. It auto-saves as the user types or modifies anything inside. The filename is automatically fixed with the object’s internal reference name. You can assigned a custom appendage at the end. So if the object is called p_0_myobject_1 and if your appendage is ex, the final filename will be p_0_myobject_1_ex and it will be stored in the launcher’s data folder (library folder).
Control Name: TextEdit
Param 1: Y Buffer
Param 2: File Name Appendage (_tx is reserved for GLCV3)
Param 3: Edition Restrictions
Example: TextEdit|20|_ex
Data Placeholder (Special)
This will create an data-placeholder set of objects so the user can choose to align two different types of data.