Config File Creator allows you to create a custom login screen for your Minecraft servers. You simply create your custom Minecraft launcher in Game Launcher Creator as normal then compile and build it out from GLCV2, then create your Login Screen using CFC Editor. This tutorial will guide you through the process of a simple, custom login screen. You will need a valid copy of Game Launcher Creator installed in order to use this function.
Step 1 – Create your Minecraft INI File
- First, create a new project (File > New Project).
- Once you have created the project, we need to create our own Minecraft INI file so we can save our user settings inside.
- Click in the menu (View > Config Files). Once the Config Files dialog appears, click the ADD button.
- Once the Add new config file dialog appears, type Minecraft in the name and for the filename something like mc.ini, select Local File then click Close.
You should then see a Minecraft configuration file appear. We can now close this dialog and continue creating our custom Minecraft login screen.
Step 2 – Creating your Custom Minecraft Login Screen
Then you need to insert a Minecraft Object. You can do this by going to the menu (Insert > Minecraft Object). You can only insert 1 Minecraft object into your project. You will also need a full, valid copy of Game Launcher Creator installed in order for this option to be available.

Once you have inserted it, you can place it anywhere inside your application window. Don’t worry, this Minecraft object will be hidden in the runtime version you build.
Now insert two textboxes, these textboxes will be our Username and Password boxes that the user will type their details into. So insert two textboxes and place them accordingly.
You can also insert two label objects and type in ‘Username’ and ‘Password’ in their properties. We have done ours like so

Now, we just need to insert a button. So go ahead and insert a button object.
You can customize all of these later on. Position your button object somewhere in the application.
Now insert a list object and position that somewhere accordingly.

Now, we need to configure the properties of the Minecraft object to tell the object which objects we are using for the login.
So go ahead and select the Minecraft (MC) object and click on the cog to bring up the properties dialog.

As you can see, it’s asking which textboxes we are using for username and password, then the login button and which list we are using.
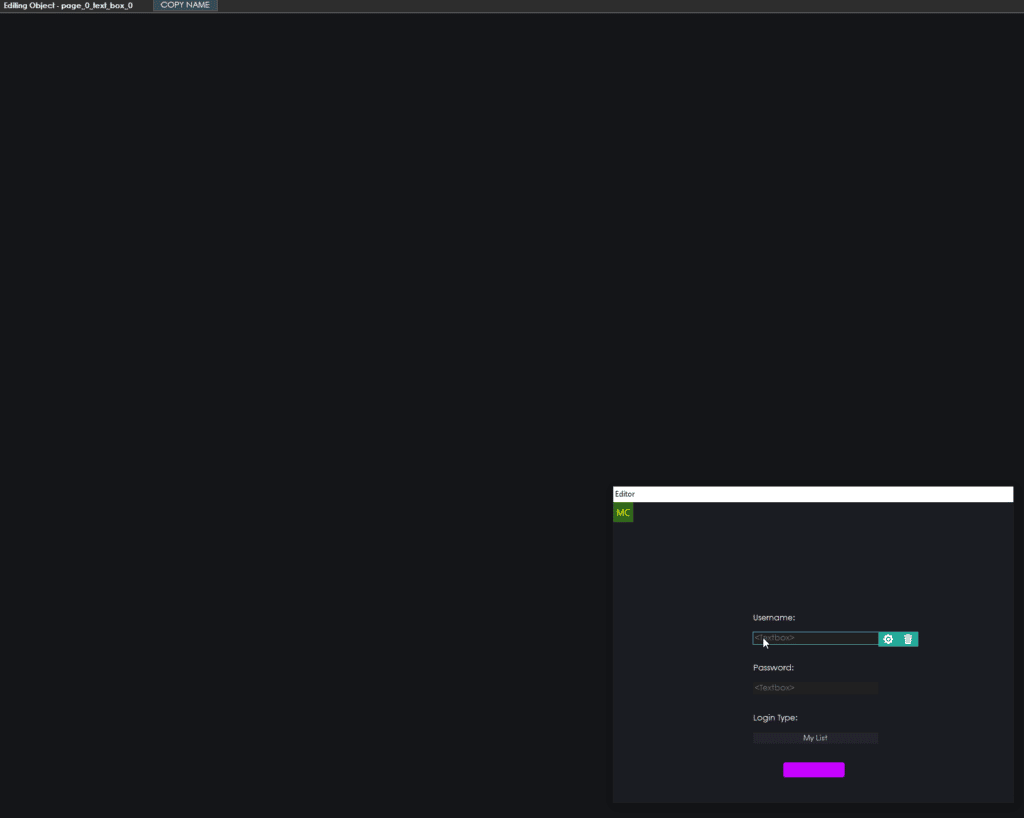
The way we do this is, close the properties dialog and select the username textbox inside the editor. Once you have selected it, in the top toolbar of the editor, you will see it’s name like this

Simply click the ‘COPY NAME’ button and this will copy the object id to your clipboard.
You can then go back to your Minecraft MC properties and paste it in.
Repeat this process for the password textbox, the login button and the list. It should look something like this…

Once you have completed this, click the CLOSE button.
Now, the final step to make this work with your GLCV2 launcher is to edit the list object

Select the list and click the COG icon to bring up the properties for the list object.
Once inside, you need to select the Minecraft config file, then in group type login_type and for item type selected. Then for the default string type in Choose Login Type. Then add 3 options, they are Microsoft, Mojang and Offline.

Final Dialog Properties
Now, in order to save the user’s details, we need to assign the Username and Password textboxes the INI file and a group and an item.
So get up the properties for the Username textbox by selecting it in the editor and clicking the COG icon.

In the Default String field, type in <Username> and then select the Minecraft config file. Then type in group login_details and for the item type in username.
Click Close. Now do the same for the password textbox, like so…

This is pretty much all the cogs required to make a working, custom login screen for your custom Minecraft launcher made with Game Launcher Creator.
Now you can edit and customize the login screen to your liking using CFC editor. Please do explore our documentation section on how to insert images and colors etc. into your login screen.
Once you are happy, compile your login screen by going to the menu in CFC editor and selecting Build > Project. Once your project has been built, you will need to copy the executable and the data folder over to the folder where your built launcher is.
Now go into GLCV2 and create a new button, on that button action select (Run Executable) and select config.exe (or whatever you called your login application executable).
When the user clicks the button inside your launcher now, it will bring up the custom login screen you made and when they input their details and click the login button, it will take them straight to your Minecraft server.
If you need any further assistance or help, please check out our online documentation and don’t forget to visit our Discord server where other users and support staff are online 24/7.


