Introduction
The AOPS (Advanced Online Patching System) is included with Game Launcher Creator V2. AOPS is a fully advanced, modern, efficient and fast patching system that you can integrate directly into your game launchers for updates.
In this step by step written tutorial, we will explore how to use AOPS from A to Z to get you on your way to using the advanced patching update in your launchers.
AOPS Video Tutorial
Before you start this written tutorial, you may prefer to watch our Video Tutorial. This was done over a Live Twitch stream and it will show you how to setup AOPS and how to create your first patch after initial release…
Step 1 – Preparing your initial game files
Step one is probably the most important step, how you initially distribute your game. However, if you have come to use GLC V2 after the initial release of your game, it’s still possible to take advantage of the AOPS system, you will just have to work out how to merge in at the best point.
In this step, we will assume it’s the first initial release of your game and your game version will be 1.0.
You should pop all your output (binary) files for release into a folder. In our example, we have put all of our game files into a folder at “F:\Tests\MyGame\” and as you can see, this is the full game structure…
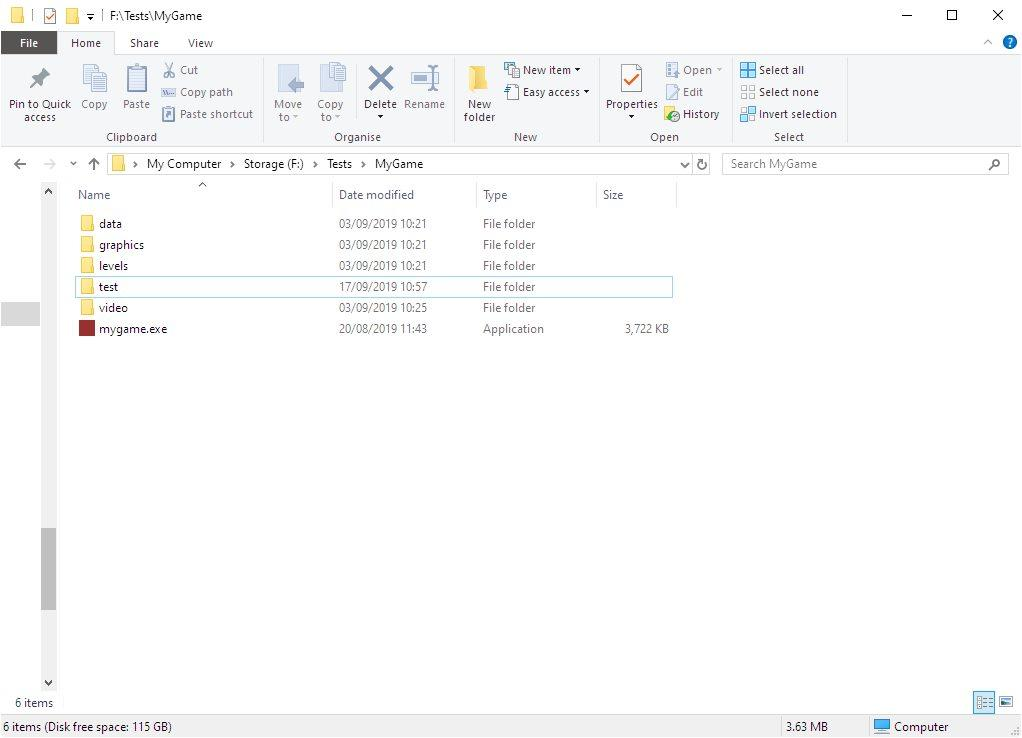
As you can see above, MyGame folder is the root of our game to be installed. We have mygame.exe which is the main game executable.
Once you have this, you can begin designing your Game Launcher in Game Launcher Creator V2 Pro. You will need to assign an ‘Update’ button somewhere. If you don’t know how to do that, we will cover it in this tutorial. So go ahead and design your game launcher as you normally would…
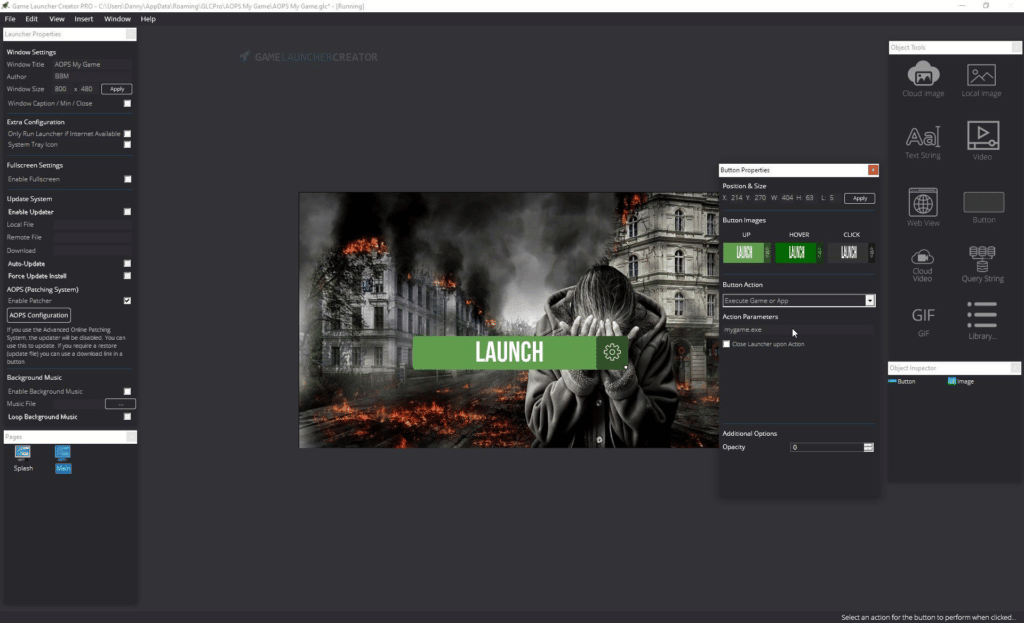
Once you have a button inserted, link it to mygame.exe by selecting ‘Execute Game or App’ and then typing in mygame.exe. The launcher will reside in the same folder as mygame.exe so no path is needed here.
Once you have done that, repeat the process for inserting an Update button. Once you have the update button in, on the properties for that button, select ‘Check for Updates’
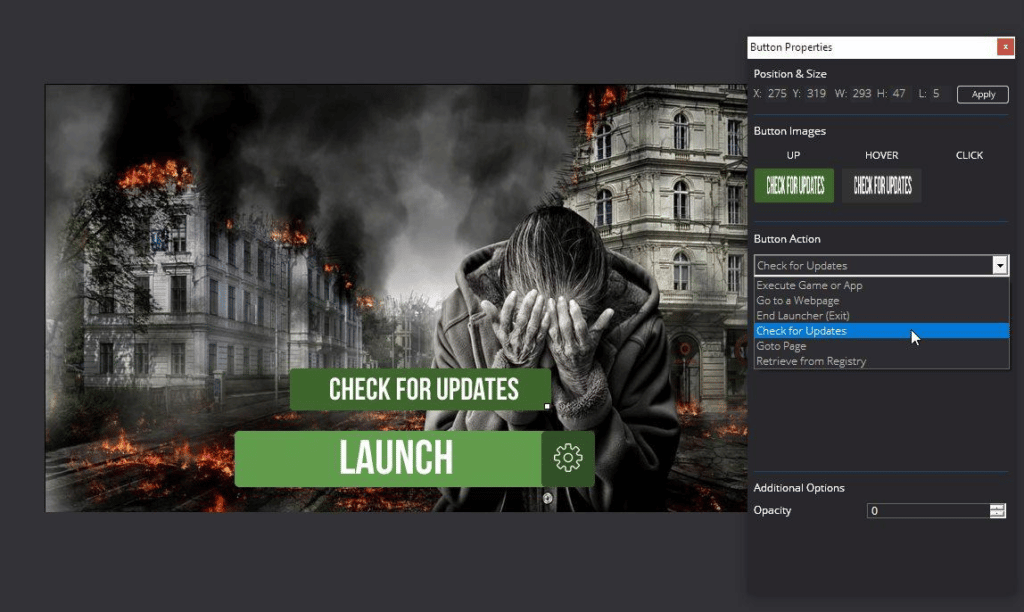
This will allow our users to click the Check for Updates button, which will tell the launcher to check the version number on our server against the version number the user has installed.
Once you have done this, head over to the Launcher Settings dialog and select ‘Enable Patcher’
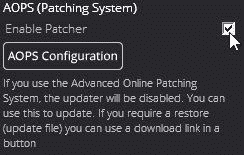
Once the AOPS system has been enabled for your launcher, the AOPS configuration button will now highlight which means it’s available to click. Click on the AOPS configuration button and let’s begin to code in our patching system, exclusive to our game development.
Step 2 – Preparing the Patching System
When you click the AOPS configuration button, a new dialog will appear. Inside here is everything we need to fill in to tell the patching system how to operate. Some things here, we will be guessing for now (we will get to those later). Let’s take a look at the first set of options…
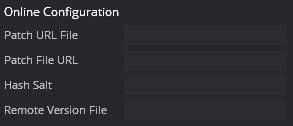
The first option is the patch URL file, which is actually the directory we will be using online to store our game files. So you need to head over to your web server (or domain) and create a directory, we called ours \TestGame\ so the directory will be https://byteboxmedia.co.uk/TestGame/
The second configuration option is the patch file URL. This is the URL where the list of files will go. We can store this anywhere, but for this example, again we will host it at https://byteboxmedia.co.uk/TestGame/patch.gcl
Hash Salt is important. Here you can make up a random bit of salt to spread on your hash key, this will make all your checksums unique, so go ahead and type in a random set of letters and numbers here and after you do this make sure you write it down or store it somewhere on your computer. It’s important for the update. For our unique hash salt key, we’re just going to use a series of random characters – hjUIUIOkJJl
Finally after that, is the remote version file. We simply put in the URL of our version text file here. So for the sake of this tutorial, we will use https://byteboxmedia.co.uk/TestGame/version.txt
So now we have our patching system prepared. Notice how we put in the Patch File URL a file called patch.gcl and we don’t even know what that is yet? That’s the list file that will contain all of our game files (and checksums) to compare against what the user has installed. We will generate that towards the end.
Step 3 – Getting the install registry information
At the end of this tutorial, you will build an installer for your initial game install (all the initial files) to the users computer. So the information we use in this next part, will be vital if you want to use the registry. If you don’t want to use the registry, you can just skip this section as the patcher will then assume that the current game installation, is the same directory as where the launcher is installed to.
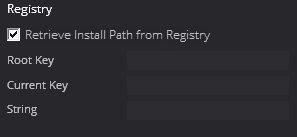
Select the checkbox Retrieve Install Path from Registry, this option will tell the patcher to retrieve the installation location of the game from the registry. If you don’t want to use the registry, leave this unchecked and the patcher will assume the user has the game files installed where the launcher is installed to (this will be the root).
We have setup our installer for MyGame, so when the user installs it to their PC, the installer will write out a series of values from the installer to the registry. This means, once the initial game is installed, we can use these registry keys to obtain information about where the user installed our game to etc. this is useful for telling the patching system where the game files are located on the users computer.
As you can see, we instructed the installer to write two keys to the registry…

InstallDir = The directory where the user installed the game to on their computer
Version = The first version number our game used
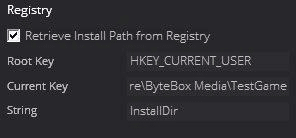
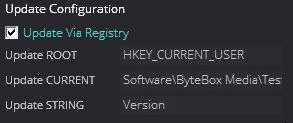
As you can see, the installer wrote to the registry under the InstallDir key where the user installed the game to on their computer which was “C:\Program Files (x86)\TestGame\” we can give our patching system this command, so it too, knows where the game files are. To do this, we type in the full ROOT key, the CURRENT key and the String, like so…
Root Key: HKEY_CURRENT_USER
Current Key: Software\ByteBox Media\TestGame
String: InstallDir
So write these settings into the AOPS registry configuration boxes, respectively.
This step is now complete. Assuming you setup your initial installer up correctly at the end of this tutorial, you should be swimming. In our example, it ends up looking like this…
Step 4 – Preparing the Version Update
Once the patcher completes, it will need to update the version number somewhere. So in this next part of the AOPS configuration dialog, you need to decide where it’s updating to/from. In our instance, we will use the Registry because (as above) you can see we got our initial installer to create a registry entry named ‘Version’ which was then stamped with the version number 1.0. So if we update our users games to 1.1, we need to tell the patcher whereabouts in the registry we need to update this number.
So in our example, it will be same settings again except this time the Update String will be Version. Like so…
If you decide to update via the INI, you can use the INI settings like so
Local INI Filename: version.ini
[GROUP] Name: version (no [] brackets needed)
String: version_number
If you decide to use a text file, simply select Update via Local File and type in the filename (usually version.txt)
Step 5 – Generating the Patch File List (Build Log)
This next step involves you clicking the Launch Scanner button.

But before you do, remember to copy or write down your hash salt key from earlier, you will need it. Once you’ve done that, click the Launch Scanner button. It will run the AOPS file scanner. What this does, is scans your game output directory (binary) and makes a list of ALL the files in that root directory and all the files in any sub-directories. It will then store the filename, filesize and hashsalt as part of the checksum.
So it basically generates a list of all your game files required to run your game. At launch, insert your hash salt key (make sure you get this correct). Then select the ‘Scan Directory’ button…

When the dialog appears, go and locate your game output directory, for us (as above) this is “F:\Tests\MyGame\” – so we select that and the scanner will now scan every single file under that to make up a checksum list. If you have a big game, this could take a while. Please try not to click on the AOPS window whilst this is processing.
Once the scan is complete, you will be presented with the list of files scanned, like so…
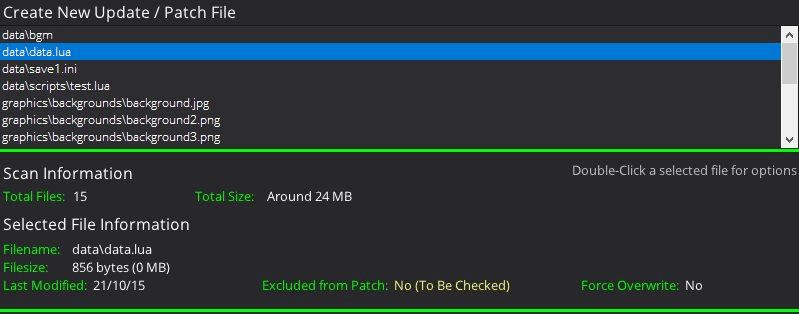
If you select each file, below it will display information about that file. It will also display the totals, like total file size for each of the files combined.
By selecting each file individually, you can double-click an entry and select Force Overwrite this will tell the patcher to re-patch this particular file everytime regardless of its checksum. You can also select Remove From Scan which means the patcher will just ignore this particular file on the patch process.
N.B Both of these switches can be useful in certain scenarios. For example:
Force Overwrite – Can be useful if a particular file needs to be re-downloaded and overwritten on the users computer
Remove from Scan – If you have a default file (ie: preferences.ini) but don’t want to overwrite the users current preference.ini file.
Once you are happy with the results, click the Build Patch Log button.
You will be prompted to save the GCL file somewhere, so pop this somewhere you remember. This will be the patch.gcl file we spoke about earlier. You will need to upload that to the URL you specified in Step 2. So go ahead and now upload that file to where you specified in Step 2 under the ‘Patch File URL‘.
Step 6 – Preparing and Uploading File Structure
This is the final part to the initial patch for your game. Once you have closed the AOPS scanner program, click the Renamer button.

Once you do this, the GLC Renamer app will launch.
Before we proceed with this step, it’s wise to make a copy of your game folder. So go ahead and make a backup of the entire MyGame folder as all the files will be renamed in here for the patching system.
Once you have backed up, in the GLC Renamer app, click the buttons with the 3 dots […] and locate your game output folder (binary), like so…
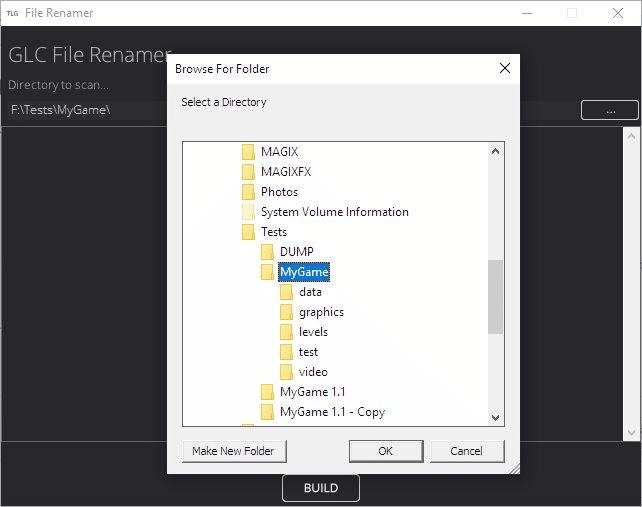
Once you have done that, click OK. When you’re ready, click the BUILD button. This scanner will run through your entire game structure and rename ALL the files and append a tlg extension, so for example (thisfile.txt will now look like thisfile.txttlg)
If you are wondering why this is, we did this intentionally, so that users should not have problems with their web hosts. If you run a VPS or Dedicated machine, you should’ve had no problems creating HTACCESS rules for allowing the installer to download a range of filetypes including ini, exe etc. but we understand that those using shared hosts or who may not know how to do the HTACCESS rewrites, we made the system more simple by just renaming ALL the files to append tlg and the patcher will rename them back once downloaded to the users computer (pretty smart huh?) 😉
Once this is done, you can now close the rename and upload your entire ROOT game output folder to the URL you specified in Step 2 – Patch URL file. In our example, this was https://byteboxmedia.co.uk/TestGame/
So we now upload our entire structure (with renamed files) to that place on our webserver…

Once this is completed, your patching system is now setup. Now you should continue to design and develop your Game Launcher until it’s ready. Once you are done, go to File > Build Launcher. Build your game launcher. Once it’s built, you will be presented with the files to distribute. You can now copy *all* of these files over to your game root directory and build an installer.
We highly recommend you use Install Creator Pro for the installer (Free will do but you won’t be able to update the Version info in the registry – you can use INI or Local File instead).
Before you build your installer, restore your files from the backup you made, otherwise you will just be installing a load of files with the extension .tlg. Eventually before you build your installer, your game output folder should look like this…
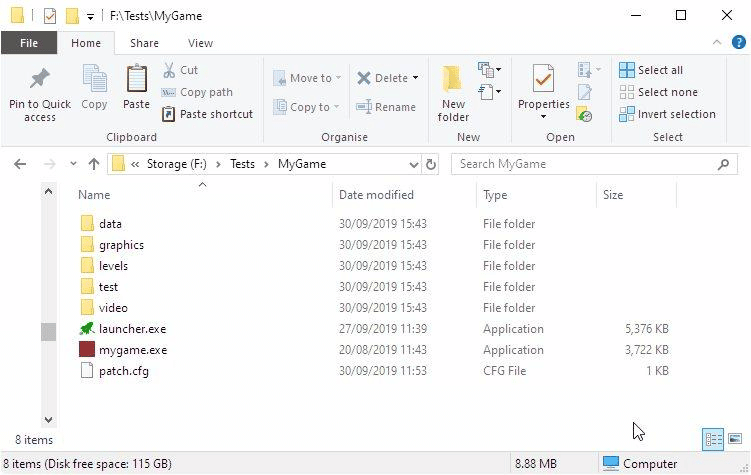
As you can see, you have your game’s executable, your game folder structure, your game launcher and all the required files. Now you just need to pack all of this up into an Installer, we recommend you use Install Creator Pro.
Don’t forget to tell Install Creator Pro to write out the two registry values, InstallDir and Version number.
That’s your initial patching system setup, complete and ready to go.
Now in future, when you do release an update, you don’t have to do much at all. We will cover that in the next step.
How to Deploy a New Patch Version
So, say you’ve worked on your game and now you have a new version to bring out, your new version may only have 3-4 or 30-40 or 300-400 file modifications. You don’t want your users to be downloading ALL your files again, if only a particular few were modified. This is where AOPS performs its best. So how do you deploy a patch? Here’s a Step by Step Guide.
Step 1 – Preparing your new updated files
So, you’ve got a new version to deploy? Now you’ve setup AOPS in your launcher, updating is easy.
First of all, create a new output folder for your new version. If your new version is 1.1, then create a folder called 1.1 and put all your game files into there (whether modified or not).
Step 2 – Scan your files to check for modified ones
Once you’ve done that, open your launcher project up in GLC V2. Click on the AOPS configuration button in the Launcher Settings.
Click on the Launch Scanner button. (Remember to input your hash salt key). Let the scanner run through all the files, then build the patch log file. Upload this file to your server where your patch file log should be.
Step 3 – Rename and re-upload your files
Then run the renamer, to rename all the files in the new 1.1 directory. Then upload all of these files to your Patch URL File directory, overwriting any files that were modified.
Step 4 – Update your remote version file
Once this is done, just head over to your version.txt file on your server and edit the version number inside to 1.1. That’s it. All done.
Every time you want to release a new update, just repeat this process. Your users will always have the most up to date version installed once they patch.
Additional Patching Information
With the AOPS system, there is a couple of things you may want to know.
Additional Switches
You can force your launcher to check for the latest version by selecting the checkbox ‘Auto-Patcher (automatically check for update)’ – this checkbox is located in the AOPS configuration dialog just below the Online Configuration.
You can force the patcher to start installing the latest version once the user has checked for an update by selecting the ‘Force Patch Update’ checkbox in the AOPS configuration dialog.
These two settings can work on their own, or together. So if you wanted to force an update check upon launch and force an update to the latest version, select both.
Debug Logger
AOPS is now external and contains a debug logger. We coded this in, just in case your users were experiencing patching problems or there was an issue with your patcher. This debug log is a text file (patch.log) and will be created inside the users %appdata% (roaming) folder, under a folder with your Game Launcher Name on it.
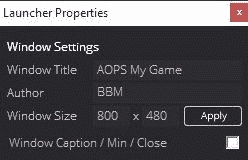
For example, our test game above is called AOPS My Game in our launcher settings…
So this means a debug patching folder is created on all users computers that do perform a patch located at:
“C:\Users\Danny\AppData\Roaming\AOPS My Game\patchtemp” – you should replace “C:\Users\Danny\” with the user trying to patch.
So if a user tries to patch and has an issue, you can tell them to head over to %appdata%, then locate ‘Window Title’ folder (in our instance AOPS My Game) and then into patchtemp folder. They will be able to send you the patch.log file for you to review.
It should be pretty self-explanatory, however if you feel like you are having problems or cannot understand what is going on, please do visit us in our Discord Channel or Send us an email and we will be able to assist you better.
When AOPS is launched, it will prompt the user “would you like to debug this patch?” and if they select YES, then it will log all activity performed, thus making troubleshooting much more easier.