Once you have signed up to LaunchBoost, you should be able to access your Dashboard by logging in.
Subscriptions are instantly active upon purchase so you should have instant access to your Dashboard here. If you do not, or there are issues, you can contact support directly here.
Step 1 – Setting up your account
The first thing you need to do when you are logged in to your Dashboard is visit the Licensing section here. From here, you should locate your license/order and click on ‘View Licenses’. You should see your license package in the table.
Click on ‘Manage Sites’ and Add a new Site. Inside here you should type in https://launchboost.io and click the ‘Add Site’ button.
https://launchboost.io
Once you have done this, your license will now be activated for use with the LaunchBoost service.
Step 2 – Developer Keys
Now head over to the Developer Keys section in your Dashboard menu.
Once you are in there, you should see two keys that need generating. The first is your API Key, if this hasn’t been generated, just click the button to generate it.
The second is your Developer ID. If this has not been generated yet, simply click the generate button.
These keys should be kept private and confidential. Although if someone does get a hold of them, don’t worry too much. There’s not much anybody else can do with these keys. These keys will not jeopardise anything on your account, although you should still try and keep them as secure as possible.
Step 3 – Configure your Patch System
You should now head over to the Patch Settings page and configure your patch system. If you need help with any of these individual settings, you can go to the patch settings documentation page here.
You should try and fill in every possible setting that requires filling in here, especially the Custom Extension, Patch Salt and Game Directory Detection.
Step 4 – Customization
Unless you plan on running a silent patch system, you can customize your patch system window in the Customization section. From here you can upload a splash screen and/or background image for the patch window, or you can select from a pre-made one we can supply you.
Step 5 – Game Details
You should now proceed to the Game Details page and fill in the information required.
Step 6 – Your Initial Game Release Files
You should create a folder on your PC, Developer Machine or Server and call the folder ‘Release‘.
You should build out all your first release or initial game files and pop them in this folder. Then you should select all the files and folders inside this Release folder and add them to a ZIP file.
Head over to your LaunchBoost dashboard and go to File Pool > Upload File(s). Upload the release ZIP file from your computer to the LaunchBoost server.
When this process is complete, it will display a green message indicating that the upload was successful and completed.
Step 7 – Rename Files
Now go to the Rename Files section and click the ‘Rename Files’ button.
This will append your Custom Extension to all of your game files in the file pool so you must ensure you have set a custom extension your Patch Settings first.
Step 8 – Generate the first Patch List
Once you have uploaded and renamed your files, you should generate the first patch list file. Go to the Patch List section of your Dashboard.
Click on the ‘Generate Patchlist’ button. The LaunchBoost server will now generate your patch list for you.
Step 9 – Set Current Version
You should now set the current release version. If this is your initial release, you should use 1.0.0 here. Set this and click ‘Save Version’.
You have now setup the initial release of your game and it is ready for distribution.
Head over to the Downloads page and download the patch executable file. You should distribute this with your installer or game launcher or whatever it is your users download to install your game.
Step 10 – Call the Patch System
If you are using a game launcher or another app like an installer for your initial download, you should call the patch executable lboost.exe with the following command line arguments:
-A<api_key>
-L<license_key>
Example
lboost.exe -A58gfdfdfdeeree473d7bff3d9707c62c66595a1 -L82938-392392-2938394
You can locate your API Key under Developer Keys in the Dashboard. You can locate your License Key by going to the License Section in the Dashboard, selecting ‘View Licenses’ and then clicking the Key icon on that page.
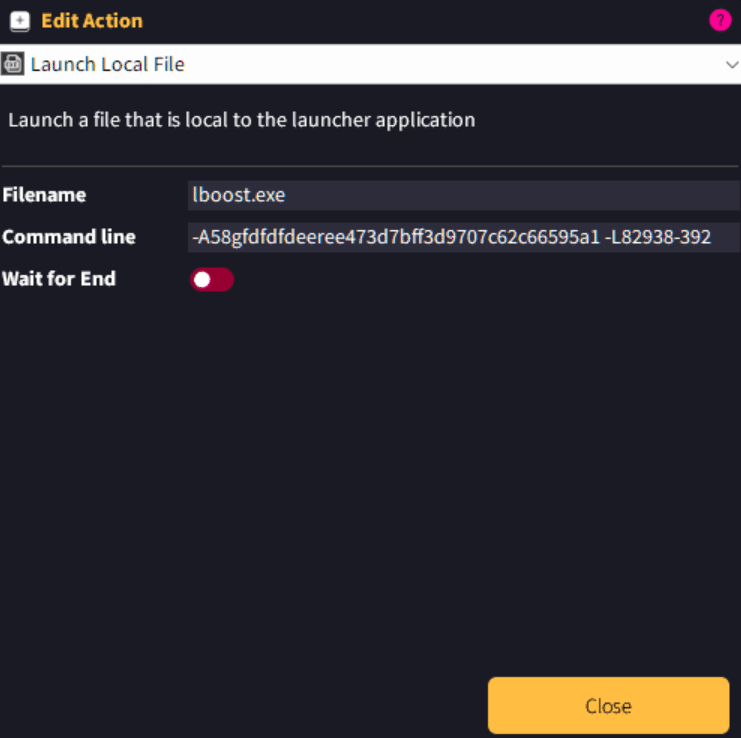
To call your Patch System from Game Launcher Creator V3, simply select the Action – Run a Local File and then type in lboost.exe and specify the command line parameters as above. It should look like this…
To call your Patch System from your game using Unity and/or C# you can use this code
using System.Diagnostics;
using UnityEngine;

public class LboostLauncher : MonoBehaviour
{
    // Method to launch lboost.exe with the provided API and license keys
    public void LaunchLboost(string apiKey, string licenseKey)
    {
        // Construct the command line arguments string
        string args = $"-A{apiKey} -L{licenseKey}";

        // Setup the process start information
        ProcessStartInfo startInfo = new ProcessStartInfo
        {
            FileName = "lboost.exe", // Ensure this path is correct
            Arguments = args,
            UseShellExecute = false,
            CreateNoWindow = true,
            RedirectStandardOutput = true,
            RedirectStandardError = true
        };

        // Try to start the process
        try
        {
            using (Process process = Process.Start(startInfo))
            {
                // Read the output (if any)
                string output = process.StandardOutput.ReadToEnd();
                string error = process.StandardError.ReadToEnd();

                process.WaitForExit(); // Wait for the process to exit

                if (!string.IsNullOrEmpty(output))
                {
                    Debug.Log($"lboost Output: {output}");
                }

                if (!string.IsNullOrEmpty(error))
                {
                    Debug.LogError($"lboost Error: {error}");
                }
            }
        }
        catch (System.Exception e)
        {
            // Handle exceptions (e.g., lboost.exe not found)
            Debug.LogError($"Failed to launch lboost.exe: {e.Message}");
        }
    }
}
You should replace {apiKey} and {licenseKey} with your respective keys.
Step 11 – Distribute
Now you have successfully setup your first initial game patch. There are many options to explore from here now. You should take a look over our Tutorial section and explore the documentation more in-depth.
There are many things you can do with the patch system such as building your own patch pages inside Unreal Engine, Unity, Clickteam Fusion, GameMaker, Construct and many more.
You can also run the patch system silently and display the progress from your own games and applications using pretty much any programming language.