If any of your users are experiencing problems with your patching system, it is very easy to debug.
Please ensure you read this documentation guide in complete and full before reaching out to support.
Error Handling
The LaunchBoost patch system automatically knows when there is an error and the user restarts the patch system, it will now invoke debug logging. So if a user experiences a problem, tell them to run the patch system again and this time it will produce a local debug log that you can ask them to send you and you can inspect.
Alternatively, you can send an additional command line parameter of -Y1 to the patch executable and it will force-enable clientside debug logging.
Check Your Serverside Logs
The first thing you should do is, ask the user to navigate to their %appdata% directory, usually found in C:\Users\<username>\AppData\Roaming (Replace <username> with their computer username). Inside of here will be a folder called LaunchBoost and inside there will be a folder named after your API Key.
Note: If the user runs a second attempt and there’s an error, the patch system will automatically open the folder where the debug log file is, or the file itself, so the user shouldn’t have to locate this folder manually.
When they (or you open the text file inside, there maybe multiple, but they are timestamped). Open it up and you will see this:
Your User ID is: d41d8cd98f00b204e9800998ecf8427e
Please give this to the Developer.
This is your user’s unique ID. This is unique to every single one of your users. Having this ID enables you now to navigate to your online patch logs and search the patch logs and see how the flow of their patching went.
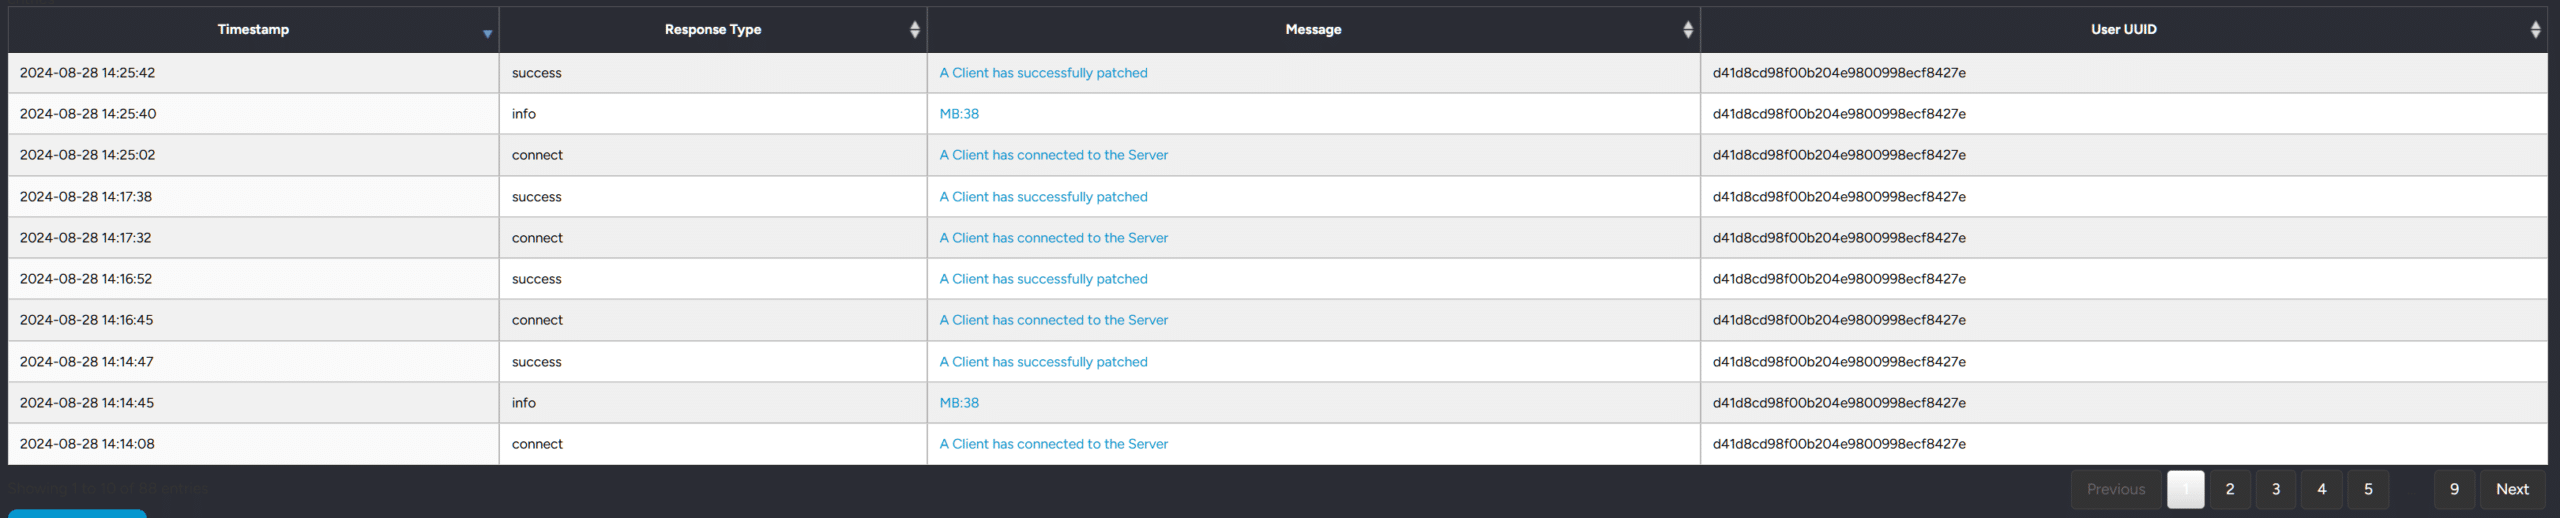
If you have lots of log entries, you can copy their User ID and paste it into the search box above the table to narrow down only logs relating to that particular user.
You should now be able to see the ‘flow’ of how the user connected to the patch system. You should see somewhere that they at least connected to the server. If you don’t see this anywhere, it means either they have no internet, a firewall app might be blocking the connection to the LaunchBoost server or something strange is going on with their internet connection (maybe using a proxy/vpn?).
If you can at least see they connected, take a look at all the other entries. It may give you a clue as to what the issue was/is.
Check the Debug Log
If you cannot figure out what the problem is from the serverside logs (they are not highly detailed), then the clientside debug log they sent you should provide you with a more in-depth overview of exactly what happened.
First Thing is First
The guide can be quite exhausting, so first of all, scroll to the very end of the log. This is typically where the actual error lies. Read the error and make sense of it. We have tried to write the debug logs in the best and most human-readable format possible. Below, we will list the stages, if you can’t figure out the problem from the standard error message, then please follow all the stages down and see if there are any errors in there.
Please remember, to try ALL URLs you see from the debug log in your browser. You can copy any URL from the debug log and paste it in to your browser’s address bar. See what error you get there.
The Stages
Here are all the stages and what they do, in order.
Stage 1 – Connecting to LaunchBoost / Obtaining Patch Settings
Example
[15:08:56] Posting to Server Log
[15:08:56] Connecting to Dev Account [************8c63ebcfe]
[15:08:56] -+-+-+ Sending Data to Log Server -+-+-+
- Response Type: connect
- Data: A Client has connected to the Server
[15:08:57] -+-+-+ Successfully Logged Data to Server -+-+-+
[15:08:59] Connecting to Server successfully
[15:08:59] Got data. Ready to split. Data Preview: *******ickname
Let’s break down the first stage. This is the actual patch system being launched.
As you can see, it will show the patch system trying to connect to your account. It should show your API Key, slightly obfuscated. This should match your API Key on LaunchBoost.
The patch system then sends information to the LB server to say “We connected successfully”.
The final part of Stage 1 is the patch system retrieving the required data from your account.
If it says “Got Data. Ready to Split”. Then you know the connection was all successful and the data received. You should see some form of text in the Data Preview.
Stage 2 – Customization Settings
Example
[15:08:59] Starting Stage 2
[15:08:59] ----- Customization Configuration -----
[15:08:59] Splash Enabled: Yes
[15:08:59] Splash Timer: 2 seconds
[15:08:59] Splash Width: 0
[15:08:59] Splash Height: 0
[15:08:59] Splash File: install-creator-2-1.jpg
[15:08:59] Background File: castlegate.jpg
This stage is all about getting the assets for your patch system loaded.
It will give you information on the Splash Screen and image information. Please make sure this matches in your account.
A splash width and/or height of 0 does not indicate an error. This is perfectly normal if you did not specify exact dimensions in your patch settings. 0 means “auto” so the patch system will size the splash screen to be the same size as the image dimensions.
Game Configuration Example
[15:08:59] ----- Game Configuration -----
[15:08:59] Game Name: LBTest
[15:08:59] Game Description: My new game
[15:08:59] Custom Extension: boost
[15:08:59] Cachebuster Type: Default
[15:08:59] Your PatchSalt: ******r21!
[15:08:59] Pre-requisites disabled
[15:08:59] Post-requisites enabled
[15:08:59] Game Directory Detection: Self
[15:08:59] Appended Rule:
[15:08:59] Reg Root:
[15:08:59] Reg Path:
[15:08:59] Reg String:
[15:08:59] Got Developer ID: ***************eaeefb
[15:08:59] Game Directory: C:\Users\danan\Desktop\LBTest\OUTPUT\

[15:08:59] Game Directory Set: C:\Users\danan\Desktop\LBTest\OUTPUT\
[15:08:59] Preparing download of BG Image...
[15:08:59] Preparing download of Splash Image...
[15:09:00] Splash Image downloaded successfully
[15:09:00] BG Image downloaded successfully
[15:09:01] Splash completed showing. Destroying.
This next part of Stage 2 is very important. It tells you information about your game configuration from your patch settings but also some information from the user’s computer.
You should triple check all the details here and make sure they match up.
You may see an issue with the Game Directory, such as an invalid folder name or something.
Stage 3 – Prerequisites
This stage shows the list of pre-requisites you have defined in your dashboard. If it is skipping, that will be because you either don’t have any, or you haven’t enabled pre-requisites from your patch settings page.
If they are running, you will see a list of pre-requisites here and all the information. You should triple check all the information to make sure it is all correct.
Stage 4 – Download Server
This stage sets up the server to download the game files from. By default, it will be the files in your Game File Pool on LaunchBoost. However, you can specify additional custom servers if you wish to.
Ether way, all the information will be in this stage, including if the user was prompted and what selection they made.
Stage 5 – Patchlist
This stage will get the patchlist, either from the LaunchBoost server, or one of your custom servers, if a custom server was selected.
It will supply you with the full URL in this section, so if there’s a problem with the patchlist URL, try copying the URL to your clipboard and pasting it into your web browser.
If it doesn’t exist, you can generate a new patchlist from your dashboard.
Stage 6 – Patching
This is the actual file integrity check / patching stage of the system.
If an error is likely to occur, it’s more than likely going to be in this stage. This will log every file that is checked from the patchlist/user’s computer and will supply as much information as possible for it. Below is an example.
Example File – Doesn’t Exist
[15:51:49] --- New File to Check ---
[15:51:49] - Local Filename: C:\Users\dan\Desktop\LBTest\OUTPUT\Uninstall\icon.ico
[15:51:49] - File Compression: 0
[15:51:49] - Ignore Flag: 0
[15:51:49] - Force Overwrite Flag: 0

[15:51:49] --- FileSizes:
[15:51:49] - Local Filesize:
[15:51:49] - Remote Filesize: 287934

[15:51:49] --- Data Modification:
[15:51:49] - Locally Modified Data: 0-00-00-00-00
[15:51:49] - Remote Modified Data: 2017-03-23-13-19

[15:51:49] --- Checksums:
[15:51:49] - Local Checksum: b60b343cb7caa36878255e4d0f58b440
[15:51:49] - Remote Checksum: b0fb3ee04063dad55787ce8a2f252979
[15:51:49] --- File Checksum Mismatch. File needs patching.

[15:51:49] --- Setting up file download with worker id: 3932213
[15:51:49] --- Downloading File with temp filename: C:\Users\dan\AppData\Roaming\LaunchBoost\2cb32291be53da315db49d08c63ebcfe\3932213_35806_temp.tmp
[15:51:49] --- File downloaded. Patching from C:\Users\dan\AppData\Roaming\LaunchBoost\2cb32291be53da315db49d08c63ebcfe\3932213_35806_temp.tmp to C:\Users\dan\Desktop\LBTest\OUTPUT\Uninstall\icon.ico
[15:51:49] --- File successfully patched. Stamping file...
[15:51:49] --- Finished with File (C:\Users\dan\Desktop\LBTest\OUTPUT\Uninstall\icon.ico). Adding to Integrity Check List.
As you can see in the above example, the file (icon.ico) didn’t exist. You can tell because the locally modified date is empty (contains 0’s). So if you look at the checksum part, you will notice the checksums are off. This tells the patch system to patch this file. So it will begin to proceed downloading the file, either from LaunchBoost or your custom server.
Once it’s downloaded successfully, it will say “File Downloaded” and it will specify where the temporary file was downloaded to. It will then patch from the temporary directory to the actual game directory.
Finally, it will stamp the file with the correct details and sign it off.
It will then add the file to the integrity check list, to be double-checked at the end of patching.
If there’s an error around a particular file, you should try downloading it manually by copying the URL from the debug log into your web browser. If there’s an error, this gives you a lead to start figuring out the problem.
If it’s a 404 error, go into your file pool on the LB website and double check it is there.
If it’s from your own custom server, you should ensure the file does exist at that location. Don’t forget, files should have their appended filenames attached to them.
For example, if we used (boost) as the custom extension, then the above file should be located at icon.icoboost. See the checklist at the bottom.
If you see the file errors in the file integrity checks, that means your files in your file pool are not up to date. You should reupload your latest game files, run the renamer and generate a new patchlist.
Stage 7 – Post-Requisites
This stage shows you all the information about postrequisites you have specified in your patch settings.
It will give you a breakdown, step-by-step of each one. If there are errors here, you should study them and figure out where the error is occuring.
Stage 8 – Finishing up
This is the finishing up stage. It will liaise with the LaunchBoost API to send a successful or unsuccessful attempt message and other messages to be logged to the serverside patch logs.
Stage 9 – Final Stage
This is the final stage. The patching system will cleanup and exit from here.