Inside GLCV3 and the AOPS2 patching system, we have included a feature to debug your game patch system on a user’s computer. To do this, you just run your patching system as you normally would, except this time you need to include the /Y1 commandline for the action.
We strongly suggest for your normal patch routine, you don’t activate debug logging as it can slow down the patching process. We recommend you have two patch buttons in your launcher. Alternatively, if you are using Developer Edition of GLCV3, you could setup a global event called ‘AOPS Failed’ and inside there, run the patch system again with debug logging.
What is the debug log file
With so many different computer setups, internet connections, ISPs, DNS setups and third party software from different users around the world, it’s impossible to expect your patch system work flawlessly everywhere. Whilst AOPS2 remains compatible with all the latest versions of Windows 10 and Windows 11, you or your users may face problems from time to time.
99% of the time, this is due to user error (you, not them). Over the last 5 years, around 99% of the AOPS reports to our support staff have been a simple Typo in a URL you did, or your server has a misconfiguration not allowing the patch system work properly.
We have written the debug logs in a step-by-step process which should give you an indication of where the problem is. However, you need to put some work in with debugging your patch setup. You cannot simply report to us “my patch system isn’t working” without thoroughly going through the debug log yourself and your patch setup to see where things are going wrong.
We have written this guide in order to lay down what’s happening in the debug log to help you in your quest of solving the issue. Please remember, throughout this debug process, check your URLs. The URLs you see in the debug log, copy them to your clipboard, open your web browser and paste the URL in and try the URL yourself. If you are presented with an error, this means it’s either a typo in your URL or your server or your web hosting is throwing an error. You can check your hosting/server logs alongside your debug log to see what’s going on.
How to locate the debug log file
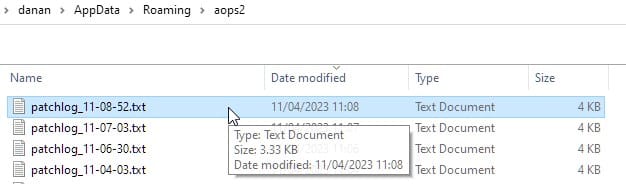
After you (or your user) has run the patch system with debug logging enabled, it will produce a debug log file. You should be able to find it in the %appdata% folder, under a folder called AOPS2. You should be able to access this by typing in %appdata% into the address bar and pressing Enter, like this…

You should then click the ‘modified’ column to sort by last modified, or just look for the debug log with the correct time of the last generation…
Stage 0 – Setting up the patch system
This stage is the initialisation setup of the patching system on the computer it is running on.
[11:08:52] AOPS2 Debug Logging Started on 04/11/23 (Tuesday - April 11)
[11:08:52] Please refer to the AOPS debug logging guide online.
The top of the file, the header, should say what day and date the patching system has started. This enables you to ensure it is the latest patch log you are looking at.
Cmdline
This is a copy of the commandline that was written to the patching system. It will use these switches to apply any configuration you wish to enforce.
[11:08:52] User's Timezone: GMT Standard Time
[11:08:52] Screen Resolution: 1920x1080
[11:08:52] Screen Depth: 32 / Refresh Rate: 60 / Screensaver Delay: 0
[11:08:52] Windows OS: 10
[11:08:52] Windows OS Version #: 62893848
[11:08:52] Number of GPUs: 2
[11:08:52] GPU #0: NVIDIA GeForce RTX 3060
[11:08:52] GPU #1: Microsoft Basic Render Driver
The patching system will then gather some software and hardware details of the user’s computer so you can see what kind of specs you’re dealing with.
[11:08:52] ActSess: 7ff4
[11:08:52] SessPrior: 8033
These are the session tokens. These are generated and sent so V3 and the patching system can create a patch session. Typically, you won’t need to read or use these. However, it is important to note that they are there. If they are missing, something went wrong between the launcher and the patch system.
Stage 1 – Configuration File
This stage sets up and loads the configuration file. Unless you specify an online configuration file, it will default to loading the patch configuration from patch.cfg inside the data folder (data\patch.cfg).
If you have sent a command to use an online configuration file, it should show in the Cmdline above first of all. Then it will tell you in the debug log what’s going on, like so…
[11:08:52] Command sent to download configuration file from https://byteboxmedia.co.uk/AOPS_2/patchcfg
[11:08:52] Configuration downloaded to C:\Users\danan\AppData\Roaming\aops2\tempconfig.cfg and is readable.
Here you can see it says the URL it captured in the commandline and which file to download.
In the above example, you can see where the configuration file was downloaded to. After the download, AOPS then checks to see if the file is readable.
The patching system than moves onto to setting up the configuration file as it creates the temporary directories for your game patcher. It is important each game/config has it’s own directory, as you may wish to patch multiple games from one launcher (or you may create new launchers in the future).
AOPS will also check to see if your config file was encrypted or not and will then decrypt the file to read, if needs be.
[11:08:52]  --- SETTING UP CONFIGURATION ---
[11:08:52] C:\Users\danan\AppData\Roaming\aops2\tempconfig.cfg exists and is readable.
[11:08:52] Project file is readable and not encrypted.
[11:08:52]  Checking and loading proper configuration...
[11:08:52] Checking temp directories and configs were created/written...
[11:08:52] Game Temp Dir was successfully created and config exists. Removing temp config...
[11:08:52] Temp config successfully removed.
In the above example, you can see the config file was readable and not encrypted. It then created the temporary game folder for the downloads. It then copies the config into that folder and removes the temporary config.
At the end of this routine, you should have a new folder created under %appdata%\aops2\ and the folder should be named by your Project Name. In our example, our project is called ‘Testbed’ so AOPS creates a folder called ‘Testbed’ and then copies our patch configuration there…

This is the folder AOPS will also use to download temporary files like the game patch files and splash screen etc.
Stage 1.4 – Splash Screen
If you have enabled a Splash Screen, AOPS will attempt to download the file and then display your splash screen whilst the patching system loads. You will have to set your own delay in the config using millseconds. 60 = 1 second / 3600 = 1 minute.
[11:08:52]  --- SPLASH ---
[11:08:52] Splash screen enabled. Downloading from https://byteboxmedia.co.uk/AOPS_2/splashtest.jpg with a filesize of 57kb
[11:08:52] Downloading at 0MB
As you can see from our example above, the patch system downloads our splash image successfully. Below, it says the speed of which is was downloaded at, but because our file is so small and our internet connection is so fast, it doesn’t really track this properly because it all happens so fast, so don’t be worried if the download speed of the splash screen shows 0MB or a small number.
So long as you see this…
Displaying Splash Screen (Width: 1280 x Height: 720)
The splash screen window should now load and display your splash screen. It will display it for the length of time you stipulated in the delay settings.
Stage 1.5 – Window Configuration
This part of the patch process sets up the Window Configuration you selected.
If you are using a silent patch process, the window will not be drawn. If you are not using a silent patch, the window will now be drawn and made visible to the user.
[12:58:11]  --- WINDOW ---
[12:58:11] Setting up Patch System Window configuration
[12:58:11] Setting Window Title to - Testbed Patch System
[12:58:11] Setting Window Resolution to - 1280 x 720
The above is output to the debug log.
The patch system will then attempt to download the window background image then load it to the window. If silent patching is enabled, this step will not show.
Stage 1.7 – Options
At this stage, all of the remaining options from your config are loaded into memory. Most are pretty self explanatory but we’ll cover them here nonetheless.
[11:09:42]  --- OPTIONS ---
[11:09:42] Cachebuster Type: Default
[11:09:42] Custom Extension:
Cachebuster Type reveals what type of cachebusting the patch system will use. Please refer to this link regarding cachebusting.
Custom Extension sets the custom extension to use for the downloading of your patch files from your server. It is highly recommend NOT to leave this blank.
[17:06:03]  --- ADDITIONAL SWITCHES SENT ---
[17:06:03] Multiple Servers switch sent - 1
[17:06:03] Nominal Server switch sent - https://byteboxmedia.co.uk/test_aops/patch_files/
Multiple Servers will show 1 if the switch was sent. The nominal server will show what server is logged to be used for the downloads if Multiple Servers is set to 1.
If you send the Multiple Servers switch (1) but don’t specify a Nominal Server switch, it will stop the patching system and exit here.
Stage 2 – Prerequisites
Prerequisites are a list of things to check before the patching procedure begins. You define a list of things to check in the editor. This is important in a lot of different scenarios. For example, you may wish to check if the user has a specific file already installed on their system or if they even have the game installed etc. You can then define what to do if each check is true or false, like open a URL, stop the patching process, download a specific file or install a particular file etc.
Here we will take a look at how the debug log breaks down each prerequisite check with your patching system.
In our example, we check for a specific file existing on the user’s computer. This file, if it was truly installed with our installer, should have a registry entry written so we can use the registry to find the install path and then check if the file exists in that location.
Our setup looks like this (this is just pseudo-code for the patcher)
[11:01:02] --- PREREQUISITES ---
[11:01:02] 2 prerequisite(s) to compile.
[11:01:02] - Added Prerequisite (Check Reg File Exists:1:HKEY_CURRENT_USER:SOFTWARE\ByteBox Media\Test EXE:InstallDir:myapp.exe:/commandline|Open URL:https://byteboxmedia.co.uk)
[11:01:02] - Added Prerequisite (Check Reg File Doesn't Exist:1:HKEY_CURRENT_USER:SOFTWARE\ByteBox Media\Test EXE:InstallDir:myapp.exe:/commandline|Open URL:https://microsoft.com)
As you can see, we have two checks. One to check if the file exists and one to check if the file does not exist. We stipulate that if the file exists, go to https://byteboxmedia.co.uk. If it doesn’t exist, go to https://microsoft.com.
The patch system will compile the list of prerequisite checks first, then it will iterate through each one individually, perform the check and if needed, perform the actions for that check.
[11:01:02] --- Prerequisite 1  ---
[11:01:02] -- Whole Command: Check Reg File Exists:1:HKEY_CURRENT_USER:SOFTWARE\ByteBox Media\Test EXE:InstallDir:myapp.exe:/commandline|Open URL:https://byteboxmedia.co.uk
[11:01:02] -- Conditions to check: Check Reg File Exists:1:HKEY_CURRENT_USER:SOFTWARE\ByteBox Media\Test EXE:InstallDir:myapp.exe:/commandline
[11:01:02] -- Actions to perform: Open URL:https://byteboxmedia.co.uk
[11:01:02] -- Setting up Registry File Check...
[11:01:02] ---- Reg Root: HKEY_CURRENT_USER
[11:01:02] ---- Reg Current: SOFTWARE\ByteBox Media\Test EXE
[11:01:02] ---- File does NOT exist: C:\Users\danan\AppData\Roaming\GLCV3\Projects\EXE Launch Test\myapp.exe - Nothing to do.
As you can see from our first check, the file was not found. The patch system looked to the registry for the location and the location existed (we can tell because no error was returned). It then proceeded to check that path location for the filename we specified, which was myapp.exe
It did nothing because we used the ‘Check Reg File Exists’ condition. It didn’t exist, so it does nothing.
However, we back this up with a second prerequisite ‘Check Reg File Doesn’t Exist’…
[11:01:02] --- Prerequisite 2  ---
[11:01:02] -- Whole Command: Check Reg File Doesn't Exist:1:HKEY_CURRENT_USER:SOFTWARE\ByteBox Media\Test EXE:InstallDir:myapp.exe:/commandline|Open URL:https://microsoft.com
[11:01:04] -- Conditions to check: Check Reg File Doesn't Exist:1:HKEY_CURRENT_USER:SOFTWARE\ByteBox Media\Test EXE:InstallDir:myapp.exe:/commandline
[11:01:04] -- Actions to perform: Open URL:https://microsoft.com
[11:01:04] -- Setting up Registry File Check...
[11:01:04] ---- Reg Root: HKEY_CURRENT_USER
[11:01:04] ---- Reg Current: SOFTWARE\ByteBox Media\Test EXE
[11:01:04] ---- File Does Not Exist: C:\Users\danan\AppData\Roaming\GLCV3\Projects\EXE Launch Test\myapp.exe - Will perform action(s).
[11:01:04] ----- Executing Action: Open URL / with Parameters: https://microsoft.com
And because the file doesn’t exist, this prerequisite is now rendered true so it performs the actions.
With prequisites, you can only perform actions for those conditions rendered true. If it is rendered false, it will do nothing and move onto the next prerequisite check.
If you sent the command line switch /K1, this will force the patch system to ignore and skip over the prerequisite checks and it will report it in the debug log like so…
[17:06:07] --- PREREQUISITES ---
[17:06:07] -- Ignore prerequisite checks sent by command line.
Stage 3 – Prepare Patch
This stage sets up everything required for the workers to start the patch process.
Everything is written directly to the log for this stage, so any errors/issues, you should be able to easily debug just off the reason the debug log provides.
Firstly, the patch system will attempt to download the patch file list from the URL you specified. If there’s an error here, it’s probably a typo in your patch list URL, or it’s a serverside error. If it’s a serverside error, you should check your website/server logs to see where the error lies. We cannot provide much support if it’s a serverside error, unless you are using one of our patch servers. Even then, you still need to double-check the debug log at the URL for the patch file. Copy the URL directly from the log and paste it into your web browser to see what you get up.
If it’s a 404 error, this means you typed the path incorrectly. Remember, you should use https://yourdomain.com/yourpath/patchfile not var/www/public_html/ or var/www/vhosts/httpdocs etc.
Stage 3.1 – Get Patch Salt
Here the patch system will attempt to download your custom patch salt from your server. If there’s an error here, it will be a typo in the URL you specified or a serverside error. You will need to debug this using your website/server logs. Contact your web host if you cannot figure it out.
Stage 3.2 – Prepare Patch List Data
Here the patch system will iterate through the patch list and filter out any files that need to be ignored. It will then compile a new list for the workers to work with when the patching starts. This shouldn’t error at all, but if it does, the only issue would be a permissions error on the user’s computer.
The only other error it could be is, your webserver gave a generic error response and served an error page as plain text so that was downloaded. If this is the case, you need to check the URL you specified earlier for your patch file list, whether in your config file or your custom command line switch. You can also check your server logs.
Stage 4 – Patching Files
This is the stage where all the workers are gathered up and they begin to work through each file. The worker system is pretty easy to imagine. The patch file list works in a list, imagine a pile of papers. The first worker will then take the first paper (the first file) and begin the checks. It will check if the file needs patching or not. If not, it will discard the paper and destroy itself.
You can have up to 7 workers working at the same time, although we recommend you choose ‘auto’ to let the patching system determine how many workers to use based on the information it has about the user’s computer.
If the file does need patching, the worker will take care of this job. It will download the file, decompress it if it needs to, then move/copy and/or stamp the file if it needs to.
The file is then put back into the list at the bottom to be verified after all the other files are completed. Here are a few errors you could get…
Stage 4.3
You may receive a http/https error with the downloading of the file. If this is the case, something is wrong with your setup. The worker cannot find the URL it was given to download the file.
The error will look like this in the debug log…
[16:00:47] - ERROR occured with download - ID: 4522035 / Response Code: 404
You can tell which file it is by the ID. Here in our example, the ID of the worker is 4522035 so you just need to go back up the log file (or do a search) for this number and there you will see all the information regarding this file. For our example, here is the information we have:
[16:00:45] [Creating Worker]
[16:00:45] - Worker ID: 4522035
[16:00:45] - Token ID: 4718646
[16:00:45] - Parser ID: 4784183
[16:00:45] - FS ID: 4849720
[16:00:45] - File ID: 4915257
[16:00:45] - Instruction Set: Configuration\Auto Shape Tools\Arrow.jsf|08072005|3|44|58|9|33802|No|No|a1aa88cb3d05a11272385a68ed8412c8
[16:00:45] - Remote Filesize: 33802
[16:00:45] - Remote Filename: https://byteboxmedia.co.uk/aops2023/files/Configuration/Auto Shape Tools/Arrow.jsfaopsc
[16:00:45] - Remote Date: 08072005
[16:00:45] - Remote Checksum: a1aa88cb3d05a11272385a68ed8412c8
[16:00:45] - Remote Year: 2005
[16:00:45] - Remote Month: 07
[16:00:45] - Remote Day: 08
[16:00:45] - Remote Hours: 3
[16:00:45] - Remote Minutes: 44
[16:00:45] - Remote Seconds: 58
[16:00:45] - Force Overwrite Flag: No
[16:00:45] - Compression Level: 9
[16:00:45] - Local Filename: C:\Users\danan\Desktop\New Patch Test\Game Install\Configuration\Auto Shape Tools\Arrow.jsf
[16:00:45] - Temp Filename: C:\Users\danan\AppData\Roaming\aops2\Testbed\4522035
[16:00:45] - File doesn't exist and needs patching: C:\Users\danan\Desktop\New Patch Test\Game Install\Configuration\Auto Shape Tools\Arrow.jsf
[16:00:45] - File doesn't exist: C:\Users\danan\Desktop\New Patch Test\Game Install\Configuration\Auto Shape Tools\Arrow.jsf
[16:00:45] - Creating paths: C:\Users\danan\Desktop\New Patch Test\Game Install\Configuration\Auto Shape Tools\
[16:00:45] - Starting download of file: https://byteboxmedia.co.uk/aops2023/files/Configuration/Auto%20Shape%20Tools/Arrow.jsfaopsc
If we look down this list of information for this worker, we can see the file in question.
If you look at the ‘Remote Filename‘ this is the remote filename it has gathered from a combination of your nominal server (your patch server URL) and the filename from the patch file. You can also see further down another name which is ‘Starting download of file‘ followed by the URL encoded. Encoded means we iterate over the URL to give it the proper syntax (ie: %20 instead of spaces).
If we look at the error in the debug log, the response code is 404. Error 404 means that the URL is incorrect or the file is not found at this URL. You can test this by simply copying the URL of the ‘Starting download of file:’ URL and pasting it directly into your web browser.
In our example above, we checked our FTP and that file was missing, we forgot to upload it. We uploaded the file and it now works.
If you get this error, then you need to check:
– The exact location of the file on your web server via FTP
– Check your patch server URL in your patch config
Here is a list of other error numbers to shed some light on what the issue could be.
If you are stuck with a 4xx error and you really can’t figure it out, let us know in Discord or post up on our forums for support.
If the error is a 5xx error you will need to get in touch with your web host regarding this. If you have a patch server with us, please contact us through the ByteBox Servers site.
Stage 5 – Postrequisites
This is the postrequisites stage. Here you can define a series of actions to run after the file integrity checks have been done, just before the patch system closes.
Any errors here, please see the above Prerequisites section as it’s the same information.
Stage 6 – Finalisation
This is the final stage of the patch process. Typically the patch system here will clean up temporary files etc.
It is this final stage where any versioning will also be updated.
Any errors here are pretty self explanatory from the debug log. If you require any particular assistance with errors here, please search our Discord support channel and if you cannot find the answer, please create a support thread and someone will help out.